Battle of Toba-Fushimi
1868 · Japan Medium
Former Shogunate — New Government · 11 turns · 59 units
Briefing
"The first cannon shot at Toba gladdened me more than gaining a million allies."
-- Saigo Takamori (attributed)
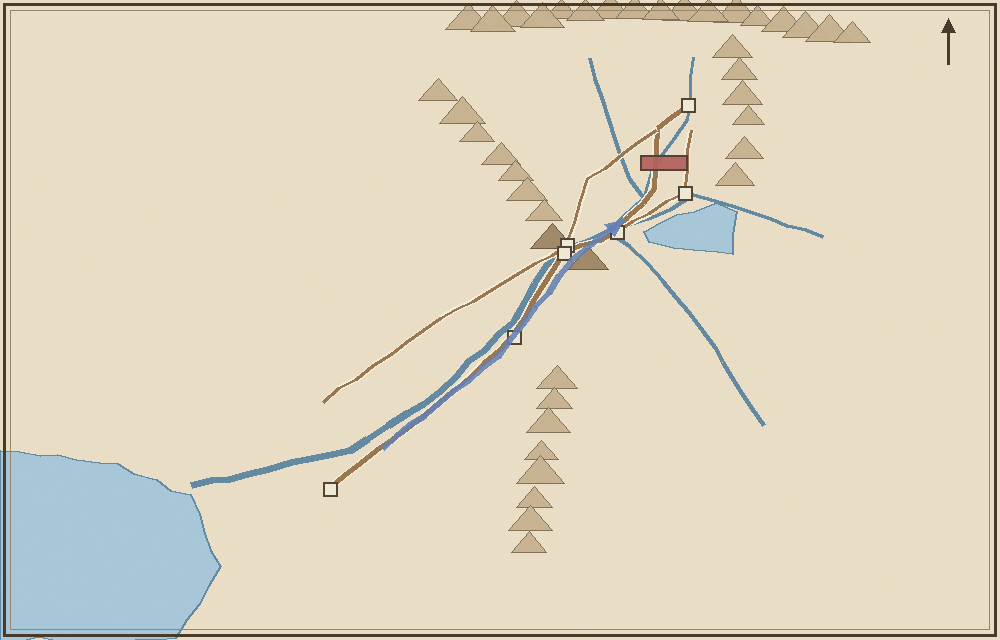
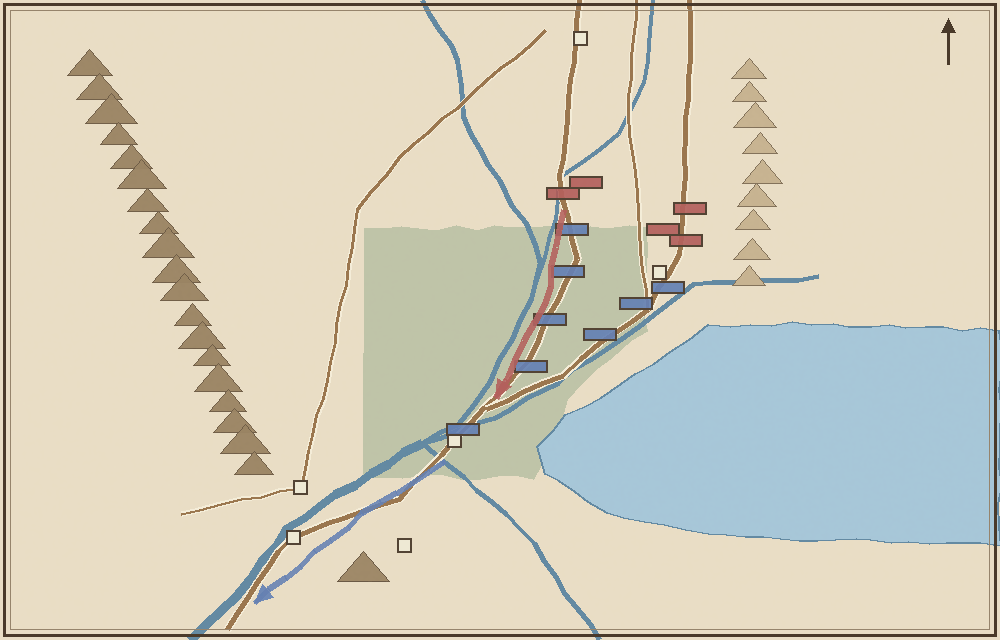
Two embankments run diagonally across the board. The western one leaves To-ji, crosses the Kamo at Koeda Bridge, links the villages of Shimotoba, Tominomori and Noso, and reaches the north of Yodo Castle. The eastern one runs from the Fushimi Bugyosho past Chushojima, down the northern embankment of the Uji River to Senryomatsu, and it too reaches Yodo. Between the two lie wet winter paddies, and a unit that comes down off an embankment pays double for each hex. To the east is the water of Ogura Pond.
On the afternoon of the 3rd day of the 1st month of Keio 4, the 15,000 men of the former Shogunate who had come up from Osaka stand in column along these two embankments. On the Toba road alone, nine counters stand in a single file, and at their head the Mimawarigumi are arguing with the Satsuma men who block the road north of Koeda Bridge. The inspector general carrying the petition to chastise Satsuma says "Let us through"; Satsuma says "By imperial command, we cannot." The sun is going down. At Fushimi, directly above the Denshutai, the Aizu and the Shinsengumi packed into the magistrate's office and the town, the Satsuma guns are emplaced on the heights of Gokonomiya.
There are two other roads up to Kyoto: the Takeda road, and the Saigoku road west of the Katsura River. Hardly anyone is guarding either.
[How the former Shogunate wins / how the new government wins] The result is decided by a single margin. Margin = (points of objectives the former Shogunate holds - points of objectives the new government holds) + (losses inflicted on the new government - losses suffered by the former Shogunate) + (points of former Shogunate units that got away to Osaka). There are seven objectives worth 155 points. The former Shogunate begins holding Yodo Castle 30, Fushimi Bugyosho 20, Hashimoto 20, Otokoyama 15 and Tominomori 10, 95 points in all; the new government holds To-ji 40 and Gokonomiya 20, 60 points. The victory line is former Shogunate +30. The opening difference is +35, so if the former Shogunate loses a single objective, it drops below the line. Finish above the line and the former Shogunate wins; below it, the new government wins. Finish 11 points beyond the victory line for a tactical victory, 92 for an operational victory, and 183 for a strategic victory. The Fushimi Bugyosho alone moves the margin by 40, so whether it falls changes the result by one grade.
[The way to Osaka] Only the former Shogunate can leave the board, by four hexes on its south-western edge (the Kyo road to Hirakata and Osaka). Each unit that gets away scores three points per point of combat strength. If Kyoto cannot be entered, bringing the army home to Osaka is also a way of winning. But if on the final turn all four hexes lie within the new government's zone of control, units that got away are counted as destroyed. Directly above the exit, on the north bank of the Yodo, is Takahama Battery.
[Those who do not move] The Yodo domain troops in Yodo Castle (the Inaba house; its lord was in Edo serving as a senior councillor) and the Tsu domain troops (the Todo house) at the Yamazaki barrier and Takahama Battery wear the colours of the former Shogunate but will not move of their own accord. The Yodo domain defects to the new government with a 60% chance from midday on the 5th (T7), rising by 40% each turn thereafter. At the moment it defects, Yodo Castle becomes a new government castle. The two Tsu counters defect with the same chances from the morning of the 6th (T9). The Yodo is a major river that cannot be crossed, and the guns at Takahama have a range of three hexes: they reach Hashimoto and Kuzuha Battery on the far bank.
There are those waiting on the new government side too. The three Tosa counters are under their lord Yodo's order "strictly no involvement", and join the battle from T3 at 60% plus 40%. The nine reserve counters at To-ji and Tofuku-ji join from T3 at 50% plus 50%, and the three Tottori and Geishu counters stationed in Kyoto from T6 at 60% plus 40%. Any of them wakes on the spot if attacked or if an enemy comes adjacent.
[Counters that can move at once] The former Shogunate: eight. They stand along the embankments with hardly any military orders worth the name. On the morning of the second day (T3) this rises by four to twelve. The new government: twelve. On the morning of the 5th (T6), when the imperial brocade banner flies, this rises by eight to twenty. While the former Shogunate holds the flag at Takeda, the new government loses three.
[Commanders] Former Shogunate: Mimawarigumi = the Kyoto Mimawarigumi (Sasaki Tadasaburo), 1st Inf Rgt = 1st Infantry Regiment, 5th Inf Rgt = 5th Infantry Regiment (Akiyama Shimosa-no-kami), 4th and 7th Inf Rgt = 4th (Yokota Izu-no-kami) and 7th Infantry Regiments (Osawa Kenichiro), 11th and 12th Inf Rgt = 11th (Sakuma Nobuhisa) and 12th Infantry Regiments (Kubota Shigeaki), Denshutai = the Denshutai (at Toba, Ogasawara Iwami-no-kami), Kuwana = the Kuwana domain (Hattori Hanzo), Ogaki = the Ogaki domain, Takamatsu = the Takamatsu domain, Aizu Bessen = the Aizu Bessentai (Sagawa Kanbei), Aizu Hayashi Bty and Shirai Bty = the Aizu artillery (Hayashi Gonsuke, Shirai Gorodayu), Aizu Tanaka, Hori, Ikoma and Ueda = the Aizu main body (Tanaka Tosa, Hori Hanemon, Ikoma Gohei, Ueda Hachiroemon), Shinsengumi = the Shinsengumi (Hijikata Toshizo), Yugekitai = the Yugekitai (Imabori Echizen-no-kami), Obama Bty = the Obama domain (Kuzuha battery), Yodo = the Yodo domain (the Inaba house), Tsu = the Tsu domain. Off the board: the commander-in-chief Okochi Masatada, the army magistrate Takenaka Shigekata, who commanded at Fushimi, and the inspector general at Toba, Takigawa Tomotaka. Kondo Isami had been shot the month before and was in Osaka.
New government: Satsuma 1st to 12th = the Satsuma castle-town rifle companies (5th, Nozu Shizuo; 6th, Ichiki Kanbei; 1st, Suzuki Bugoro; 2nd, Henmi Jurota; 3rd, Shinohara Kunimoto; 4th, Kawamura Sumiyoshi; 7th, Niiro Gunpachi; 8th, Nomoto Sukehachi; 9th, Kabayama Sukenori; 12th, Ijuin Yoichi), Tojo = the rifle companies of the outer districts (1st, Murata Tsuneyoshi; 2nd, Tsuchimochi Yushiro; 3rd, Arima Seinojo; 4th, Nakamura Gensuke), Shiryo 2nd = the 2nd private-domain company (Samejima Hachijuro), Heigu 1st = the 1st ordnance company (Kawaji Toshiyoshi), 1st Bty and 2nd Bty = the Satsuma batteries (1st, Nakahara Naosuke; 2nd, Oyama Yasuke), Choshu = Choshu (the Seibutai, Tamura Jinsuke; the 2nd Kiheitai, Hayashi Tomoyuki and Sera Shuzo; the Yugekitai, Goto Masanori; the Kiheitai, Fukuda Kyohei; the Shinbutai, Ishikawa Asanosuke), Tosa = Tosa (Yamaji Chushichi, Yoshimatsu Hayanosuke, Yamada Kikuma, Futagawa Motosuke, Kitamura Chobei), Tottori = the Tottori domain (Tada Takejiro, Kondo Ruizo), Geishu = the Geishu domain (Nanbu Kensuke). Off the board: the staff officers Ijichi Masaharu (Toba), Yoshii Tomozane (Fushimi) and Yamada Akiyoshi (Choshu); Saigo Takamori and Okubo Toshimichi in Kyoto; and at To-ji, the commander-in-chief of the punitive expedition (Seito Daishogun), Prince Ninnajinomiya Yoshiakira.
[Decisions this board lets you test] First: does the former Shogunate come down off the embankments? Push on in column, and only the leading one or two counters are fired upon, while those behind can do nothing. Come down, and every hex costs double, while you are fired on from the side.
Second: do you go round by the empty roads? Take Takeda and the new government loses three moves. The Saigoku road is beyond the Katsura River, reachable only by cutting diagonally across the paddies. Every unit sent round thins the two embankments.
Third: where do you cut your losses? From T7 at Yodo Castle and from T9 at Hashimoto, the ground under your feet begins to give way. Once it is clear the army cannot enter Kyoto, how much of it can you bring home to Osaka?
The new government, conversely, is asked how far to pursue. Hold Fushimi and Toba and you will not lose. But to win, you must come down as far as Yodo.
[Outcome] On the evening of the 5th, as the former Shogunate army fell back after burning the Yodo Kobashi bridge, the gates of Yodo Castle did not open. The lord of the domain had taken up his post as senior councillor in Edo. The army burned the Yodo Ohashi bridge as well, crossed the Kizu River, and drew a last line at Otokoyama and Hashimoto. At midday on the 6th, guns of the Todo house fired from Yamazaki across the Yodo into the western flank of that line. They had guarded that place since Keio 1, and in three days they had not fired a single shot. The line at Hashimoto broke, and the army went down the Kyo road to Osaka.
That night Tokugawa Yoshinobu left Osaka Castle, taking with him the lords of Aizu and Kuwana. He spent the night aboard an American warship outside the harbour, and sailed for Edo in the Kaiyo Maru. The troops who reached a castle with no Shogun in it scattered eastward. The former Shogunate lost some 280 killed and the new government some 110. A small battle of four days became the first four days of a war that would run on for a year and a half, as far as Hakodate.
At Koeda Bridge, one shot.
The sky over Fushimi was red all night.
The gates of Yodo did not open.
From Yamazaki on the far bank, the Todo guns.
Fifteen thousand went down to Osaka.
That night, a ship sailed for Edo.
The march from Osaka and the council in Osaka Castle over the petition to chastise Satsuma have been folded away. The river courses are an estimate restored to their state before the Meiji diversions (the Kizu joining south of Yodo, the Uji between Yodo and Noso). Small contingents such as those of the Hamada and Toba domains have been folded into other counters, and the Yodo reserves such as the Iyo-Matsuyama domain have been dropped from the board. Accounts differ on where and when the imperial brocade banner first flew; on the board it appears as an increase in the new government's moves on the morning of the 5th.
1 hex = 500 m, 1 turn = about 4 hours (nights are folded), 1 CS = about 100 men as a guide, with differences in training and firearms added. T1 = 1/3 16:00 (fighting begins at Koeda Bridge), T2 = 1/3 21:00 (the magistrate's office burns), T3 = 1/4 07:00, T6 = 1/5 07:00 (the imperial brocade banner), T7 = 1/5 11:00 (the gates of Yodo), T9 = 1/6 07:00 (the line at Hashimoto), T11 = 1/6 15:00 (to Osaka).
Maps
 TOBA-FUSHIMI
Kyoto
Fushimi
Yodo
Yamazaki
Hashimoto
Hirakata
Osaka
Osaka Bay
Yodo R.
Ogura Pond
Shogunate army
Satsuma, Choshu
Saigoku road
TOBA-FUSHIMI
Kyoto
Fushimi
Yodo
Yamazaki
Hashimoto
Hirakata
Osaka
Osaka Bay
Yodo R.
Ogura Pond
Shogunate army
Satsuma, Choshu
Saigoku road
 To-ji
Koeda Bridge
Gokonomiya
Fushimi Bugyosho
Tominomori
Senryomatsu
Yodo Castle
Hashimoto
Otokoyama
Yamazaki (Tsu)
Takeda
Ogura Pond
wet winter paddies
Saigoku road
to Osaka
To-ji
Koeda Bridge
Gokonomiya
Fushimi Bugyosho
Tominomori
Senryomatsu
Yodo Castle
Hashimoto
Otokoyama
Yamazaki (Tsu)
Takeda
Ogura Pond
wet winter paddies
Saigoku road
to Osaka